Build your first application - part one
Using the tasks application that we created during the Intro section. We are going to build out a small application to introduce Alto.js and how it is used with a react.js view layer.
We will start by examining our default file structure for Alto.js applications as seen below.
tasks
public/
src/
.env
.gitignore
package.json
README.md/
If you’ve used create-react-app cli to generate your projects. Then this should look relatively familiar to you. In fact, under the hood, our cli simply invoked create-react-app. All though alto.js leverages react and it's infrastucture. Philosophy, Expanding our src directory will reveal what makes Alto special.
src
application/
framework/
theme/
index.js
Within the framework directory you will find all Alto.js api’s. In an event that you need to create additional or custom api’s, we recommend adding a directory within frameworks for such a case. Additionally, within theme you will find all Alto theme classes. And last but not least, our application directory.
application/
controllers/
router/
ui/
utils/
core.js
Since Alto is a tool used to build utility applications and not small isolated components or marketing websites. We have settled on the tried and true patterns of MVC architecture. By moving to a MVC architecture, we allow components to share data across each other without passing values down our UI tree, as well as share data across routes. Ultimately, our view layer has one concern now. Describe how our UI looks. While controllers deal with storing data and records deal with describing our data. Additionally, ‘State’ is no longer stored in a component and the need for a middleware to synchronize data is no longer needed.
If you would like to read the deep dive on Alto architecture. Check out architecture and design patterns.
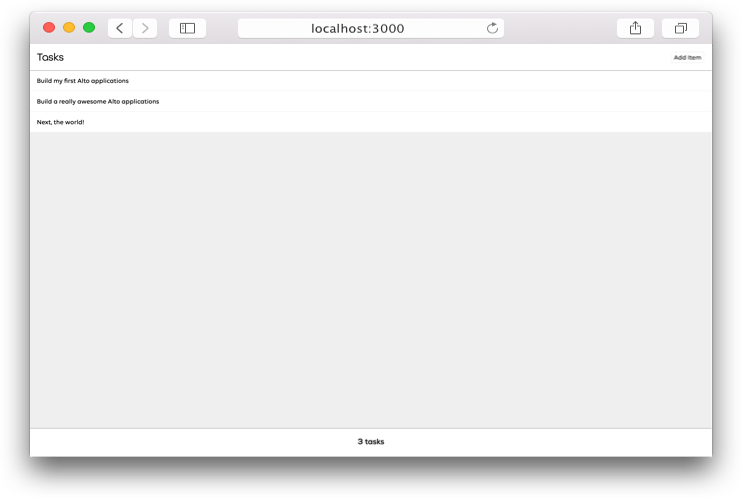
Let’s get going on building our first Alto application. Below is the end result of our application.

Open up the UI directory and add the following files.
- tasks_view.js
- tasks_view.module.css
- tasks_view.module.css
Next, update tasks_view.js with the code below.
import React from "react" ;
import View from "framework/alto/ui/view.js" ;
import LabelView from "framework/alto/ui/label_view.js" ;
import ButtonView from "framework/alto/ui/button_view.js" ;
import css from "./tasks_view.module.css" ;
className={css.base}>
className={css.toolbar}>
className={css.toolbarTitle}
title={'Tasks'}
/>
className={css.toolbarAddButton}
title={'Add Item'}
/>
className={css.middleView}
/>
className={css.bottomToolbar}>
className={css.bottomTitle}
title={'0 tasks'}
/>
Additionally, add the following to tasks_view.module.css
.base {
position: absolute;
top: 0em;
left: 0em;
right: 0em;
bottom: 0em;
}
.toolbar {
composes: AltoToolbar from 'theme/alto/toolbar.module.css'
}
.toolbarTitle {
composes: AltoToolbarTitle from 'theme/alto/fonts/core.module.css'
}
.toolbarAddButton {
composes: AltoButtonView from 'theme/alto/buttons/core.module.css'
margin-left: auto;
}
.middleView {
position: absolute;
top: 4em;
left: 0em;
right: 0em;
bottom: 4em;
background-color: #EFEFEF;
overflow-y: scroll;
}
.bottomToolbar {
composes: AltoToolbarBottom from 'theme/alto/toolbar.module.css'
}
.bottomTitle {
composes: AltoToolbarSubTitle from 'theme/alto/fonts/core.module.css'
}
position: absolute;
top: 0em;
left: 0em;
right: 0em;
bottom: 0em;
}
composes: AltoToolbar from 'theme/alto/toolbar.module.css'
}
composes: AltoToolbarTitle from 'theme/alto/fonts/core.module.css'
}
composes: AltoButtonView from 'theme/alto/buttons/core.module.css'
margin-left: auto;
}
position: absolute;
top: 4em;
left: 0em;
right: 0em;
bottom: 4em;
background-color: #EFEFEF;
overflow-y: scroll;
}
composes: AltoToolbarBottom from 'theme/alto/toolbar.module.css'
}
composes: AltoToolbarSubTitle from 'theme/alto/fonts/core.module.css'
}
All views in Alto.js are expressed as React.js “function components”. Through hooks, Alto provides a Key-Value Observing mechanism for synchronizing data with minimal “glue code". To see more on KVO patterns visit key-value-observing patterns.
Without abstracting too much away from a development team, Alto exposes styling in a more traditional web manner through css modules. Customizing the UI Controls can be achieved by modifying the provided base theme or by creating your own styles to compose.